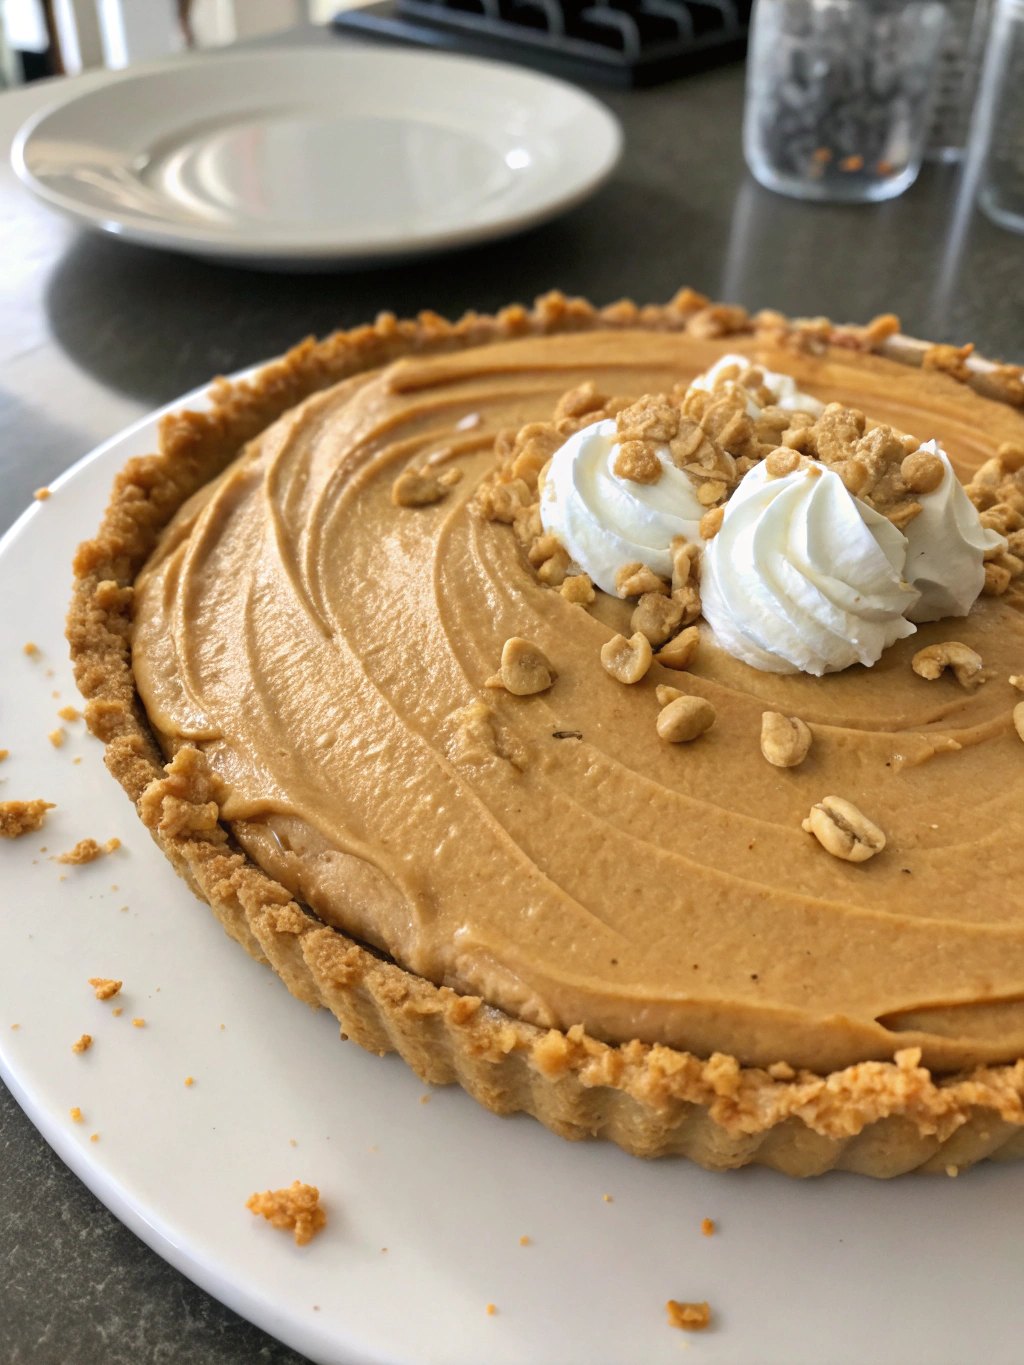
This silky, creamy peanut butter pie features a perfect balance of sweet and salty flavors with a chocolate cookie crust, velvety peanut butter filling, and whipped cream topping. Ready in under 30 minutes of active prep time, it’s an impressive no-bake dessert that’s guaranteed to please peanut butter lovers.
Easy Peanut Butter Pie Recipe
There’s something undeniably comforting about a homemade Peanut Butter Pie. The combination of rich, nutty peanut butter folded into a cloud-like cream cheese mixture, all nestled in a chocolate cookie crust creates a dessert that’s both nostalgic and irresistible. This classic no-bake Peanut Butter Pie recipe has been my go-to for family gatherings for years, especially during summer months when turning on the oven feels like a crime.
What makes this Peanut Butter Pie truly special is its perfect balance of sweet and salty flavors, along with its luxurious texture that somehow manages to be both light and decadent simultaneously. Whether you’re serving it for a holiday celebration or a casual weekend treat, this pie has a way of making any occasion feel special.
THIS RECIPE:
- Requires just 8 simple ingredients you likely have in your pantry
- Features a no-bake preparation method—perfect for warm weather
- Can be made up to 2 days in advance for stress-free entertaining
- Easily customizable with various toppings and garnishes
| Recipe Details | Information |
|---|---|
| Prep Time | 25 minutes |
| Chill Time | 4 hours |
| Total Time | 4 hours 25 minutes |
| Servings | 8-10 slices |
| Yield | One 9-inch pie |
This Peanut Butter Pie recipe strikes the perfect balance between impressive and approachable. The no-bake preparation means there’s no fussing with oven temperatures or bake times, making it virtually foolproof. Even if you’re a beginner in the kitchen, you’ll be able to create a dessert that looks and tastes like it came from a gourmet bakery—but with minimal effort and maximum flavor.
Ingredients for Peanut Butter Pie

The secret to an exceptional Peanut Butter Pie lies in using high-quality ingredients. Since this recipe features relatively few components, each one plays an important role in the final flavor and texture. I recommend using creamy, commercial-style peanut butter rather than natural varieties that can separate and affect the texture of your filling.
For the Chocolate Cookie Crust:
- 24 chocolate sandwich cookies (like Oreos)
- 5 tablespoons unsalted butter, melted
For the Peanut Butter Filling:
- 1 cup creamy peanut butter (not natural)
- 8 ounces cream cheese, softened
- 1 cup powdered sugar
- 1 teaspoon pure vanilla extract
- 1 cup heavy whipping cream
- 2 tablespoons granulated sugar
For the Topping (Optional):
- ½ cup heavy whipping cream
- 2 tablespoons powdered sugar
- ¼ cup chopped peanut butter cups
- 2 tablespoons chocolate syrup
- 2 tablespoons crushed peanuts
When selecting your peanut butter, brands like Jif or Skippy work best for this recipe as they create a stable, smooth filling. Natural peanut butters tend to be oilier and can cause the filling to break or become grainy. For the cream cheese, always choose full-fat varieties for the richest flavor and creamiest texture.
| Ingredient Category | Recommended Quantity | Quality Tips |
|---|---|---|
| Peanut Butter | 1 cup | Use commercial creamy varieties rather than natural for better texture and stability |
| Cream Cheese | 8 ounces | Choose full-fat, brick-style cream cheese at room temperature for smoothest results |
| Chocolate Cookies | 24 cookies | Chocolate sandwich cookies provide the perfect balance of sweetness and chocolate flavor |
| Heavy Cream | 1½ cups total | Look for heavy whipping cream with at least 36% fat content for best whipping results |
| Sweeteners | 1 cup powdered + 2 tbsp granulated | Powdered sugar dissolves easily while granulated helps stabilize whipped cream |
How to Make Peanut Butter Pie
Creating the perfect Peanut Butter Pie involves a few simple techniques that ensure a silky-smooth filling and perfectly textured crust. The process can be broken down into three main components: preparing the cookie crust, making the peanut butter filling, and assembling the final pie with optional toppings.
Step 1: Prepare the Chocolate Cookie Crust
- Place the chocolate sandwich cookies in a food processor and pulse until they form fine crumbs.
- Add the melted butter to the crumbs and pulse until the mixture resembles wet sand.
- Transfer the crumb mixture to a 9-inch pie dish.
- Using the bottom of a measuring cup, press the crumbs firmly and evenly across the bottom and up the sides of the dish.
- Refrigerate the crust for at least 30 minutes to set while preparing the filling.
Step 2: Create the Peanut Butter Filling
- In a large mixing bowl, beat the cream cheese with an electric mixer until smooth and fluffy, about 2 minutes.
- Add the peanut butter and continue beating until completely incorporated.
- Mix in the powdered sugar and vanilla extract until the filling is smooth with no lumps.
- In a separate chilled bowl, whip the heavy cream with the granulated sugar until stiff peaks form.
- Gently fold the whipped cream into the peanut butter mixture using a rubber spatula, maintaining as much air as possible for a light texture.
Step 3: Assemble the Pie
- Remove the chilled crust from the refrigerator.
- Spoon the peanut butter filling into the crust, creating an even layer.
- Smooth the top with an offset spatula.
- Refrigerate the pie for at least 4 hours or preferably overnight to allow it to set completely.
Step 4: Add Optional Toppings
- Before serving, whip the remaining ½ cup heavy cream with 2 tablespoons powdered sugar until soft peaks form.
- Spread or pipe the whipped cream over the chilled pie.
- Sprinkle with chopped peanut butter cups and crushed peanuts.
- Drizzle with chocolate syrup for an extra touch of decadence.
The key to a perfectly textured Peanut Butter Pie is ensuring your cream cheese is fully softened before beginning. Cold cream cheese will result in lumps that are difficult to incorporate. Additionally, be gentle when folding in the whipped cream to maintain the light, airy texture that makes this pie so special.
Tips for Making Peanut Butter Pie
The difference between a good Peanut Butter Pie and an extraordinary one often comes down to the little details. Here are my expert recommendations for elevating your homemade Peanut Butter Pie to bakery-quality perfection:
- Use room temperature cream cheese – Take cream cheese out of the refrigerator at least 1 hour before making the filling to ensure it blends smoothly.
- Chill your mixing bowl and beaters before whipping the cream for maximum volume and stability.
- Fold, don’t stir the whipped cream into the peanut butter mixture to maintain airiness.
- Create defined layers by chilling the crust thoroughly before adding filling.
| Technique | Recommendation | Why It Matters |
|---|---|---|
| Measuring Peanut Butter | Spray measuring cup with cooking spray first | Allows peanut butter to release cleanly for accurate measuring |
| Crushing Cookies | Use a food processor rather than hand-crushing | Creates uniform crumbs for a more stable crust |
| Whipping Cream | Use medium-high speed until just past soft peaks | Overwhipping can create a grainy texture |
| Setting the Pie | Refrigerate overnight if possible | The flavors meld and the texture perfects with longer chilling |
Pro tip: For the smoothest possible filling, scrape down the sides of the bowl several times while mixing the cream cheese and peanut butter. This extra attention ensures no pockets of unmixed ingredients remain, giving you that professional-quality texture.
When pressing the crust into your pie dish, use firm, even pressure. A crust that’s too loosely packed may crumble when serving. For picture-perfect slices, dip your knife in hot water and wipe clean between cuts.
Make-Ahead Instructions
One of the greatest advantages of this Peanut Butter Pie recipe is its make-ahead friendly nature, making it perfect for entertaining or holiday preparation when time is at a premium. Here’s how to prepare components in advance for maximum convenience:
The complete Peanut Butter Pie (without toppings) can be prepared up to 2 days in advance and stored covered in the refrigerator. In fact, the pie often tastes even better after the flavors have had time to meld overnight.
For even more advanced preparation:
- The chocolate cookie crust can be made up to 3 days ahead and stored covered in the refrigerator.
- The peanut butter filling can be prepared 1 day ahead and stored in an airtight container in the refrigerator.
- Whipped cream topping is best prepared shortly before serving, but can be made up to 4 hours ahead if stabilized with the recommended amount of sugar.
If you’re planning to freeze components, the cookie crust freezes exceptionally well for up to 1 month when wrapped tightly. Simply thaw in the refrigerator overnight before filling.
For the freshest presentation, add any garnishes like chopped peanut butter cups, crushed peanuts, or chocolate drizzle just before serving, even if the rest of the pie was prepared in advance.
Storing Leftovers
Proper storage is crucial for maintaining the delicious flavor and creamy texture of your Peanut Butter Pie. Follow these guidelines to ensure leftover slices remain as delightful as when freshly made:
Store any leftover Peanut Butter Pie in the refrigerator, covered tightly with plastic wrap or in an airtight container. The pie will maintain its best quality for up to 5 days when properly refrigerated at 40°F or below.
For optimal food safety, avoid leaving the pie at room temperature for more than 2 hours. The dairy components in both the filling and topping can spoil if left out too long, particularly in warm environments.
When covering the pie with plastic wrap, you may want to insert toothpicks around the top to prevent the wrap from sticking to any whipped cream topping or garnishes. Alternatively, use a pie keeper or cake dome if you have one available.
If you notice any weeping (liquid separation) after a few days of storage, this is normal and doesn’t mean the pie has spoiled. Simply blot away any excess moisture with a paper towel before serving.
Freezing Peanut Butter Pie
This Peanut Butter Pie freezes beautifully, making it an excellent dessert to prepare well in advance of special occasions. Here’s how to freeze, thaw, and serve your pie with perfect results:
To freeze a whole Peanut Butter Pie:
- Prepare the pie through the filling stage but omit any whipped cream topping or garnishes.
- Allow the pie to chill in the refrigerator until completely firm, at least 4 hours.
- Wrap the entire pie (still in its dish) in a layer of plastic wrap, pressing it gently against the surface to prevent freezer burn.
- Add a second layer of plastic wrap, then a layer of aluminum foil for extra protection.
- Label with the date and freeze for up to 1 month.
When you’re ready to enjoy your frozen pie:
- Transfer the wrapped pie from the freezer to the refrigerator 12-24 hours before serving.
- Once fully thawed, remove all wrapping.
- Add fresh whipped cream topping and garnishes just before serving.
- For the cleanest slices, dip a sharp knife in hot water and wipe dry between cuts.
You can also freeze individual slices by wrapping them separately. This allows you to enjoy a sweet treat whenever the craving strikes without thawing an entire pie.
Pro tip: If you notice any condensation on the pie surface after thawing, gently blot it with a paper towel before adding toppings. This prevents a watery layer from forming between the pie and garnishes.
Serving Suggestions
A perfect Peanut Butter Pie deserves thoughtful presentation and complementary flavors to create a memorable dessert experience. Here are my favorite ways to serve this crowd-pleasing treat:
For classic presentation, serve each slice with a dollop of additional whipped cream and a light dusting of cocoa powder or grated chocolate. The contrast of the dark chocolate against the cream creates visual appeal while enhancing the flavor experience.
Elevate your Peanut Butter Pie with these delicious accompaniments:
- A drizzle of warm chocolate ganache poured over cold slices
- Crushed peanut butter cups or chopped roasted peanuts for texture contrast
- Fresh raspberry sauce for a bright, fruity counterpoint to the rich filling
- A scoop of vanilla ice cream alongside for the ultimate indulgence
For beverage pairings, serve with:
- Cold milk (whole or almond milk works beautifully)
- Strong coffee or espresso to balance the sweetness
- A small glass of bourbon for adult gatherings
- Hot chocolate for cozy winter servings
Serve Peanut Butter Pie chilled but not ice-cold—remove from the refrigerator about 10-15 minutes before serving to allow the flavors to fully bloom. The ideal temperature lets the filling maintain its structure while becoming just soft enough for the perfect creamy mouthfeel.
For special occasions, consider creating a dessert board with small slices of Peanut Butter Pie alongside complementary treats like chocolate-dipped pretzels, mini peanut butter cookies, and fresh berries.
FAQ
Can I use natural peanut butter in this Peanut Butter Pie recipe?
I don’t recommend using natural peanut butter for this recipe. Natural varieties tend to separate and contain more oil, which can prevent the filling from setting properly. Commercial brands like Jif or Skippy create a more stable filling with the ideal texture. If you must use natural peanut butter, make sure it’s well-mixed and consider reducing the amount slightly to account for the higher oil content.
What can I substitute for the chocolate sandwich cookies in the crust?
If you don’t have chocolate sandwich cookies, you can use 1½ cups of graham cracker crumbs mixed with 3 tablespoons of cocoa powder and the same amount of melted butter. Alternatively, chocolate graham crackers make an excellent substitution. For a more intense chocolate flavor, chocolate wafer cookies work beautifully. The key is maintaining the right ratio of crumbs to butter for a crust that holds together well.
My filling turned out lumpy. What went wrong?
Lumpy filling is almost always caused by cream cheese that wasn’t soft enough before mixing. To fix this, ensure your cream cheese sits at room temperature for at least 1 hour before beginning. If you’re short on time, unwrap the cream cheese, cut it into small cubes, and place on a plate for 15-20 minutes to speed up the softening process. Also, be sure to thoroughly beat the cream cheese before adding any other ingredients, scraping the bowl frequently.
How do I get clean slices when serving Peanut Butter Pie?
For picture-perfect slices, dip a sharp knife in hot water, wipe it dry, and then make your cut. Repeat this process between each slice. The warm knife glides through the cold filling without dragging or creating messy edges. Chilling the pie thoroughly (at least 4 hours, preferably overnight) also helps achieve cleaner slices as the filling will be properly set.
Can I make this Peanut Butter Pie dairy-free?
Yes, this recipe can be adapted for dairy-free diets. Replace the cream cheese with dairy-free cream cheese alternative, substitute the heavy cream with full-fat coconut cream (the solid portion from a can of coconut milk, chilled overnight), and use dairy-free butter in the crust. The texture may be slightly different, but the flavor will still be delicious. Just ensure your peanut butter doesn’t contain hidden dairy ingredients.